Introduction to Trait Editor Factories
The preceding code samples in this User Manual have been surprisingly simple considering the sophistication of the interfaces that they produce. In particular, no code at all has been required to produce appropriate widgets for the Traits to be viewed or edited in a given window. This is one of the strengths of TraitsUI: usable interfaces can be produced simply and with a relatively low level of UI programming expertise.
An even greater strength lies in the fact that this simplicity does not have to be paid for in lack of flexibility. Where a novice TraitsUI programmer can ignore the question of widgets altogether, a more advanced one can select from a variety of predefined interface components for displaying any given Trait. Furthermore, a programmer who is comfortable both with TraitsUI and with UI programming in general can harness the full power and flexibility of the underlying GUI toolkit from within TraitsUI.
The secret behind this combination of simplicity and flexibility is a TraitsUI construct called a trait editor factory. A trait editor factory encapsulates a set of display instructions for a given trait type, hiding GUI-toolkit-specific code inside an abstraction with a relatively straightforward interface. Furthermore, every predefined trait type in the Traits package has a predefined trait editor factory that is automatically used whenever the trait is displayed, unless you specify otherwise.
Consider the following script and the window it creates:
Example 12: Using default trait editors
# default_trait_editors.py -- Example of using default trait editors

from traits.api import Bool, HasTraits, Range, Str
from traitsui.api import Item, View


class Adult(HasTraits):
    first_name = Str()
    last_name = Str()
    age = Range(21, 99)
    registered_voter = Bool()

    traits_view = View(
        Item(name='first_name'),
        Item(name='last_name'),
        Item(name='age'),
        Item(name='registered_voter'),
    )


alice = Adult(
    first_name='Alice',
    last_name='Smith',
    age=42,
    registered_voter=True,
)

alice.configure_traits()
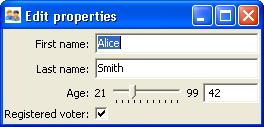
Figure 12: User interface for Example 12
Notice that each trait is displayed in an appropriate widget, even though the code does not explicitly specify any widgets at all. The two Str traits appear in text boxes, the Range is displayed using a combination of a text box and a slider, and the Bool is represented by a checkbox. Each implementation is generated by the default trait editor factory (TextEditor, RangeEditor and BooleanEditor respectively) associated with the trait type.
TraitsUI is by no means limited to these defaults. There are two ways to override the default representation of a trait attribute in a TraitsUI window:
Explicitly specifying an alternate trait editor factory
Specifying an alternate style for the editor generated by the factory
The remainder of this chapter examines these alternatives more closely.
Specifying an Alternate Trait Editor Factory
As of this writing the TraitsUI package includes a wide variety of predefined trait editor factories, which are described in Basic Trait Editor Factories and Advanced Trait Editors. Some additional editor factories are specific to the wxWidgets toolkit and are defined in one of the following packages:
traitsui.wx
traitsui.wx.extra
traitsui.wx.extra.windows (specific to Microsoft Windows)
These editor factories are described in “Extra” Trait Editor Factories.
For a current complete list of editor factories, refer to the Traits API Reference.
Other packages can define their own editor factories for their own traits. For example, enthought.kiva.api.KivaFont uses a KivaFontEditor() and enthought.enable2.traits.api.RGBAColor uses an RGBAColorEditor().
For most predefined trait types (see Traits User Manual), there is exactly one predefined trait editor factory suitable for displaying it: the editor factory that is assigned as its default. 15 There are exceptions, however; for example, a Str trait defaults to using a TextEditor, but can also use a CodeEditor or an HTMLEditor. A List trait can be edited by means of ListEditor, TableEditor (if the List elements are HasTraits objects), CheckListEditor or SetEditor. Furthermore, the TraitsUI package includes tools for building additional trait editors and factories for them as needed.
To use an alternate editor factory for a trait in a TraitsUI window, you must
specify it in the View for that window. This is done at the Item level, using
the editor keyword parameter. The syntax of the specification is
editor = editor_factory(). (Use the same syntax for specifying that
the default editor should be used, but with certain keyword parameters
explicitly specified; see Initializing Editors).
For example, to display a Str trait called my_string using the default editor factory (TextEditor()), the View might contain the following Item:
Item(name='my_string')
The resulting widget would have the following appearance:

Figure 13: Default editor for a Str trait
To use the HTMLEditor factory instead, add the appropriate specification to the Item:
Item( name='my_string', editor=HTMLEditor() )
The resulting widget appears as in Figure 14:

Figure 14: Editor generated by HTMLEditor()
Note
TraitsUI does not check editors for appropriateness.
TraitsUI does not police the editor argument to ensure that the specified editor is appropriate for the trait being displayed. Thus there is nothing to prevent you from trying to, say, display a Float trait using ColorEditor(). The results of such a mismatch are unlikely to be helpful, and can even crash the application; it is up to the programmer to choose an editor sensibly. The Predefined Trait Editor Factories is a useful reference for selecting an appropriate editor for a given task.
It is possible to specify the trait editor for a trait in other ways:
You can specify a trait editor when you define a trait, by passing the result of a trait editor factory as the editor keyword parameter of the callable that creates the trait. However, this approach commingles the view of a trait with its model.
You can specify the editor attribute of a TraitHandler object. This approach commingles the view of a trait with its controller.
Use these approaches very carefully, if at all, as they muddle the MVC design pattern.
Initializing Editors
Many of the TraitsUI trait editors can be used “straight from the box” as in the example above. There are some editors, however, that must be initialized in order to be useful. For example, a checklist editor (from CheckListEditor()) and a set editor (from SetEditor()) both enable the user to edit a List attribute by selecting elements from a specified set; the contents of this set must, of course, be known to the editor. This sort of initialization is usually performed by means of one or more keyword arguments to the editor factory, for example:
Item(
    name='my_list',
    editor=CheckListEditor(
        values=["opt1","opt2","opt3"],
    ),
)
The descriptions of trait editor factories in The Predefined Trait Editor Factories include a list of required and optional initialization keywords for each editor.
Specifying an Editor Style
In TraitsUI, any given trait editor can be generated in one or more of four different styles: simple, custom, text or readonly. These styles, which are described in general terms below, represent different “flavors” of data display, so that a given trait editor can look completely different in one style than in another. However, different trait editors displayed in the same style (usually) have noticeable characteristics in common. This is useful because editor style, unlike individual editors, can be set at the Group or View level, not just at the Item level. This point is discussed further in Using Editor Styles.
The ‘simple’ Style
The simple editor style is designed to be as functional as possible while requiring minimal space within the window. In simple style, most of the Traits UI editors take up only a single line of space in the window in which they are embedded.
In some cases, such as the text editor and Boolean editor (see Basic Trait Editor Factories), the single line is fully sufficient. In others, such as the (plain) color editor and the enumeration editor, a more detailed interface is required; pop-up panels, drop-down lists, or dialog boxes are often used in such cases. For example, the simple version of the enumeration editor for the wxWidgets toolkit looks like this:

Figure 15: Simple style of enumeration editor
However, when the user clicks on the widget, a drop-down list appears:
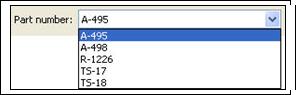
Figure 16: Simple enumeration editor with expanded list
The simple editor style is most suitable for windows that must be kept small and concise.
The ‘custom’ Style
The custom editor style generally generates the most detailed version of any given editor. It is intended to provide maximal functionality and information without regard to the amount of window space used. For example, in the wxWindows toolkit, the custom style the enumeration editor appears as a set of radio buttons rather than a drop-down list:
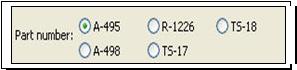
Figure 17: Custom style of enumeration editor
In general, the custom editor style can be very useful when there is no need to conserve window space, as it enables the user to see as much information as possible without having to interact with the widget. It also usually provides the most intuitive interface of the four.
Note that this style is not defined explicitly for all trait editor implementations. If the custom style is requested for an editor for which it is not defined, the simple style is generated instead.
The ‘text’ Style
The text editor style is the simplest of the editor styles. When applied to a given trait attribute, it generates a text representation of the trait value in an editable box. Thus the enumeration editor in text style looks like the following:

Figure 18: Text style of enumeration editor
For this type of editor, the end user must type in a valid value for the attribute. If the user types an invalid value, the validation method for the attribute (see Traits User Manual) notifies the user of the error (for example, by shading the background of the text box red).
The text representation of an attribute to be edited in a text style editor is created in one of the following ways, listed in order of priority:
The function specified in the format_func attribute of the Item (see The Item Object), if any, is called on the attribute value.
Otherwise, the function specified in the format_func parameter of the trait editor factory, if any, is called on the attribute value.
Otherwise, the Python-style formatting string specified in the format_str attribute of the Item (see The Item Object), if any, is used to format the attribute value.
The Python-style formatting string specified in the format_str parameter of the trait editor factory, if any, is used to format the attribute value.
Otherwise, the Python str() function is called on the attribute value.
The ‘readonly’ style
The readonly editor style is usually identical in appearance to the text style, except that the value appears as static text rather than in an editable box:

Figure 19: Read-only style of enumeration editor
This editor style is used to display data values without allowing the user to change them.
Using Editor Styles
As discussed in Contents of a View and Customizing a View, the Item, Group and View objects of TraitsUI all have a style attribute. The style of editor used to display the Items in a View is determined as follows:
The editor style used to display a given Item is the value of its style attribute if specifically assigned. Otherwise the editor style of the Group or View that contains the Item is used.
The editor style of a Group is the value of its style attribute if assigned. Otherwise, it is the editor style of the Group or View that contains the Group.
The editor style of a View is the value of its style attribute if specified, and ‘simple’ otherwise.
In other words, editor style can be specified at the Item, Group or View level, and in case of conflicts the style of the smaller scope takes precedence. For example, consider the following script:
Example 13: Using editor styles at various levels
# mixed_styles.py -- Example of using editor styles at various levels

from traits.api import Enum, HasTraits, Str
from traitsui.api import Group, Item, View


class MixedStyles(HasTraits):
    first_name = Str()
    last_name = Str()

    department = Enum("Business", "Research", "Admin")
    position_type = Enum("Full-Time", "Part-Time", "Contract")

    traits_view = View(
        Group(
            Item(name='first_name'),
            Item(name='last_name'),
            Group(
                Item(name='department'),
                Item(name='position_type', style='custom'),
                style='simple',
            ),
        ),
        title='Mixed Styles',
        style='readonly',
    )


ms = MixedStyles(first_name='Sam', last_name='Smith')
ms.configure_traits()
Notice how the editor styles are set for each attribute:
position_type at the Item level (lines 19-20)
department at the Group level (lines 18 and 21)
first_name and last_name at the View level (lines 16, 17, and 23)
The resulting window demonstrates these precedence rules:
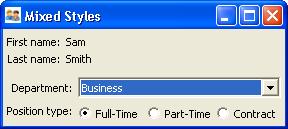
Figure 20: User interface for Example 13
Footnotes
- 15
Appendix II contains a table of the predefined trait types in the Traits package and their default trait editor types.